Install Lets Encrypt SSL Certificate using Docker, WordPress and DigitalOcean
In this article I am going to show you that how to install SSL Certificate on your wordpress website using Docker, Docker compose, Let’s Encrypt and Digital Ocean.
If you are interested in Video version of this article then you watch it from following youtube video:
I assume that you already have Docker and Docker compose installed and functional already.
To start you should create following folder structure:
In docker-compose.yaml file we will create three services:
1- WordPress
2- MySQL
3- Nginx ( letsencrypt image )
1- WordPress Service
.....
  wordpress:2
    image: wordpress:5.2.2-php7.3-apache
    container_name: wordpress
    restart: always
    depends_on:
      - mysql
    stdin_open: true
    tty: true
    volumes:
      - ./src:/var/www/html
    env_file:
      - .env
I added restart policy always. The benefit of this policy is that in case if your docker container stopped because of any error or crashed then it would automatically restart the container. That helps a lot because you don’t need to manually go to server and restart.
As this wordpress container depends on the mysql server because as you know that wordpress cannot work without a functional mysql server. So we should wait for the mysql service to be ready first before creating wordpress service. So to wait we added depends_on property.
stdin_open and tty are added to keep container alive forever.
In the volumes array I mounted our local src folder with the html container inside the container. So the benefit of this step is that if you remove the container then it would not delete the volumes that you have mounted. In this way you can persist your data without any loss.
You don’t need to expose any port for wordpress container because we are not going to access wordpress container directly. Its the nginx container that would forward our traffic to wordpress container’s port 80. I will show that later in this article.
in env_file array I added .env file path because wordpress image needs us to pass some environment variables as shown in the following screenshot:
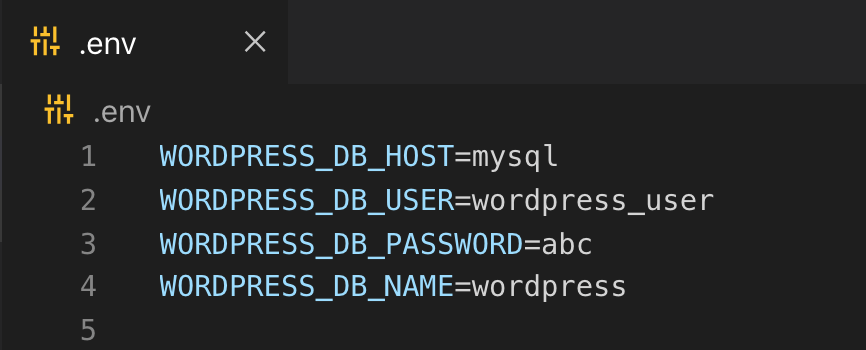
Normally we use localhost as the database host name. But in this case mysql and wordpress will be installed in two different containers hence normally wordpress cannot access mysql on localhost host. But with the magic of docker-compose we can communicate any container from any container. We just need to use the name of server instead of localhost.
As we set the service name mysql for mysql server so that is why we would use mysql as host name through the environment variable WORDPRESS_DB_HOST
In other three variables, you need to add database username, password and database name. So make sure that in next steps you should use same names in mysql service.
2- MySQL service:
.....
  mysql:
    container_name: mysql
    volumes:
      - ./docker/mysql/data:/var/lib/mysql
      - ./docker/mysql/configs/my.cnf:/etc/mysql/my.cnf
    ports:
      - 3306:3306
    image: mysql:5.6
    restart: always
    env_file:
      - .env
I mounted two volumes. One is data folder to store all data files of mysql and second is my.cnf file so that I can easily change mysql settings in future if needed without going inside container.
Next you need to expose 3306 port and map it with your local 3306 port.
Just copy paste following my.cnf file:
# Copyright (c) 2017, Oracle and/or its affiliates. All rights reserved.
#
# This program is free software; you can redistribute it and/or modify
# it under the terms of the GNU General Public License as published by
# the Free Software Foundation; version 2 of the License.
#
# This program is distributed in the hope that it will be useful,
# but WITHOUT ANY WARRANTY; without even the implied warranty of
# MERCHANTABILITY or FITNESS FOR A PARTICULAR PURPOSE.  See the
# GNU General Public License for more details.
#
# You should have received a copy of the GNU General Public License
# along with this program; if not, write to the Free Software
# Foundation, Inc., 51 Franklin St, Fifth Floor, Boston, MA  02110-1301 USA

#
# The MySQL  Server configuration file.
#
# For explanations see
# http://dev.mysql.com/doc/mysql/en/server-system-variables.html

[mysqld]
pid-file        = /var/run/mysqld/mysqld.pid
socket          = /var/run/mysqld/mysqld.sock
datadir         = /var/lib/mysql
secure-file-priv= NULL
# Disabling symbolic-links is recommended to prevent assorted security risks
symbolic-links=0

# Custom config should go here
!includedir /etc/mysql/conf.d/
innodb_buffer_pool_size = 20M
3- nginx Service
  nginx:
    image: linuxserver/letsencrypt
    ports:
      - 80:80
      - 443:443
    volumes:
      - ./docker/nginx/config:/config
      - ./docker/nginx/nginx.conf:/config/nginx/site-confs/default
      - ./docker/nginx/ssl.conf:/config/nginx/ssl.conf
    container_name: nginx
    restart: unless-stopped
    environment:
      - PUID=1000
      - PGID=1000
      - TZ=Europe/London
      - URL=yourdomainname.com
      - SUBDOMAINS=www,
      - VALIDATION=http
      - STAGING=false #optional
Here I exposed port 80 and 443 and mapped it with the local port 80 and 443 respectively to receive traffic directly.
Then I mounted the volumes pass my configuration and persist the configurations and certificate related files.
In the property SUBDOMAINS you can add as many sub domains as you want by separating them with comma. You can check the official documentation of the linuxserver/letsencrypt image to see all available options. There are different validation methods. But the easiest method it by using http validation.
As the initial stage you should set the value of STAGING equal to true. Because for the first time you want to test if your all configurations are correct. Production certificate has rate limits. So you cannot create a lot of certificates within specific limit of time. So to avoid to reach the rate limit, you should first try staging that would then create fake certificate. After you see that fake certificate is live in your website then you are ready to change the value from staging=true to false to apply real production certificate.
Use following configuration file in your file structure:
nginx.conf
# redirect all traffic to https
server {
  listen 80;
  listen [::]:80;
  server_name _;
  return 301 https://$host$request_uri;
}

# main server block
server {
  listen 443 ssl http2 default_server;
  listen [::]:443 ssl http2 default_server;

  server_name _;

  # enable subfolder method reverse proxy confs
  include /config/nginx/proxy-confs/*.subfolder.conf;

  # all ssl related config moved to ssl.conf
  include /config/nginx/ssl.conf;

  client_max_body_size 0;

  location / {
    proxy_pass http://wordpress:80;
    proxy_redirect off;
    proxy_set_header Host $host;
    proxy_set_header X-Real-IP $remote_addr;
    proxy_set_header X-Forwarded-For $proxy_add_x_forwarded_for;
    proxy_set_header X-Forwarded-Host $host;
    proxy_set_header X-Forwarded-Server $host;
    proxy_set_header X-Forwarded-Proto $scheme;
  }
}
There is only one important thing to note in above file that is proxy_pass value. I used proxy_pass http://wordpress:80;
In this value you need to provide the name of the service of wordpress that you mentioned in docker-compose.yaml
ssl.conf
## Version 2018/05/31 - Changelog: https://github.com/linuxserver/docker-etsencrypt/commits/master/root/defaults/ssl.conf

# session settings
ssl_session_timeout 1d;
ssl_session_cache shared:SSL:50m;
ssl_session_tickets off;

# Diffie-Hellman parameter for DHE cipher suites
ssl_dhparam /config/nginx/dhparams.pem;

# ssl certs
ssl_certificate /config/keys/letsencrypt/fullchain.pem;
ssl_certificate_key /config/keys/letsencrypt/privkey.pem;

# protocols
ssl_protocols TLSv1.1 TLSv1.2;
ssl_prefer_server_ciphers on;
ssl_ciphers 'ECDHE-RSA-AES128-GCM-SHA256:ECDHE-ECDSA-AES128-GCM-SHA256:ECDHE-RSA-AES256-GCM-SHA384:ECDHE-ECDSA-AES256-GCM-SHA384:DHE-RSA-AES128-GCM-SHA256:ECDHE-RSA-AES128-SHA256:ECDHE-ECDSA-AES128-SHA256:ECDHE-RSA-AES128-SHA:ECDHE-ECDSA-AES128-SHA:ECDHE-RSA-AES256-SHA384:ECDHE-ECDSA-AES256-SHA384:ECDHE-RSA-AES256-SHA:ECDHE-ECDSA-AES256-SHA:DHE-RSA-AES128-SHA256:DHE-RSA-AES128-SHA:DHE-RSA-AES256-SHA256:DHE-RSA-AES256-SHA:!aNULL:!eNULL:!EXPORT:!DES:!RC4:!MD5:!PSK:!aECDH:!EDH-DSS-DES-CBC3-SHA:!EDH-RSA-DES-CBC3-SHA:!KRB5-DES-CBC3-SHA';

# HSTS, remove # from the line below to enable HSTS
add_header Strict-Transport-Security "max-age=63072000; includeSubDomains; preload" always;

# OCSP Stapling
ssl_stapling on;
ssl_stapling_verify on;

# Optional additional headers
#add_header Content-Security-Policy "upgrade-insecure-requests";
#add_header X-Frame-Options "SAMEORIGIN" always;
#add_header X-XSS-Protection "1; mode=block" always;
#add_header X-Content-Type-Options "nosniff" always;
#add_header X-UA-Compatible "IE=Edge" always;
#add_header Cache-Control "no-transform" always;
#add_header Referrer-Policy "same-origin" always;
Now our files are ready to run.
Before that you should create a droplet on digital ocean. After your droplet is ready you will get an ip address like this: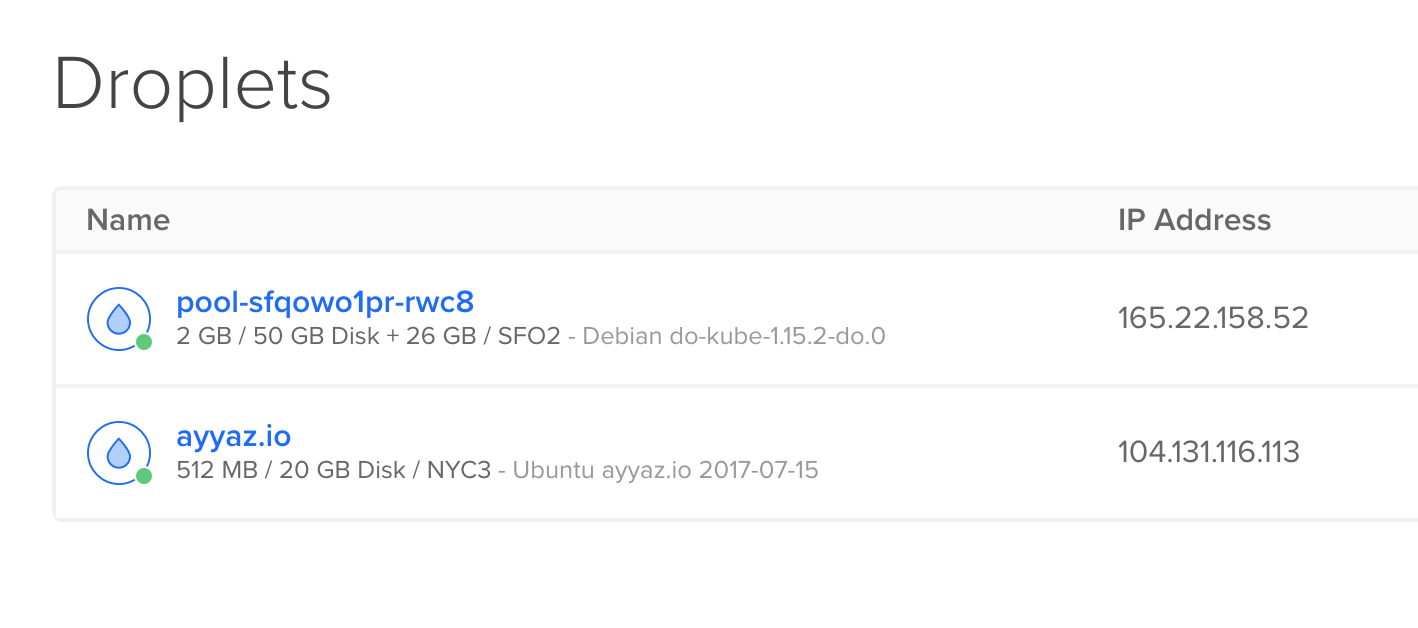
Copy the ip address and change the A record of your domain name to set this ip address.
I linked my domain name server with digital ocean so I can change A record right from the digitalOcean domains section. But if you are managing domain name from other domain company then still procedure is same. let me show you screenshot of A record in digital ocean.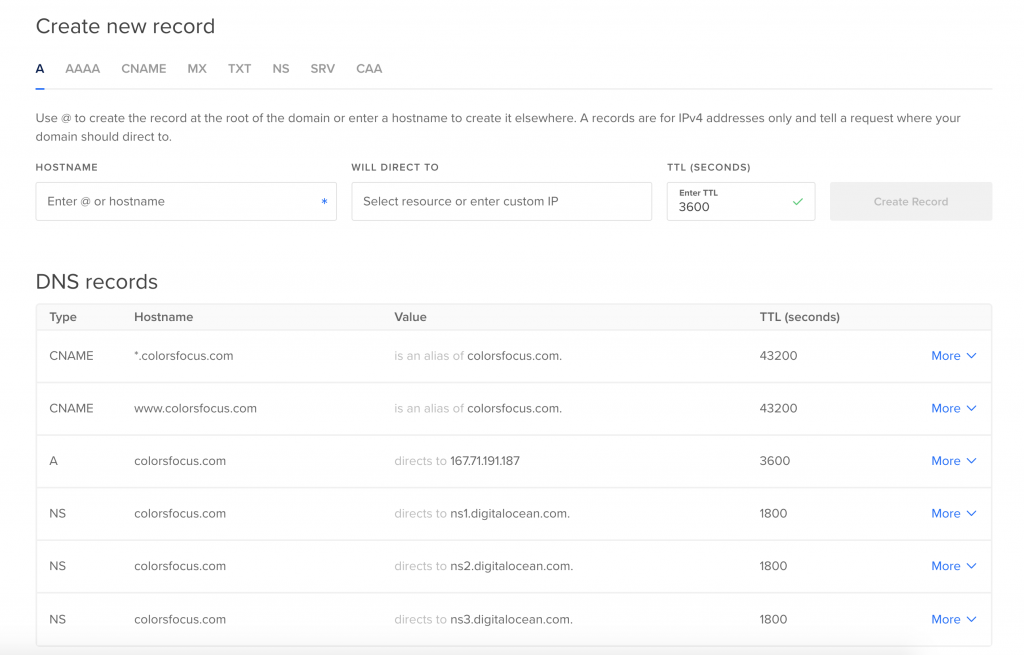
After A record is added then you are ready to continue.
First create folder /root/project/ in the droplet and copy all your files to the droplet. I used this command form the root of my project folder:
scp -r ./* root@www.yourdomainame.com:/root/projectYou have to ssh into your container. I used this command to enter into this container but you can use password if this does not work for you:
ssh root@www.yourdomainname.comNow run this command:
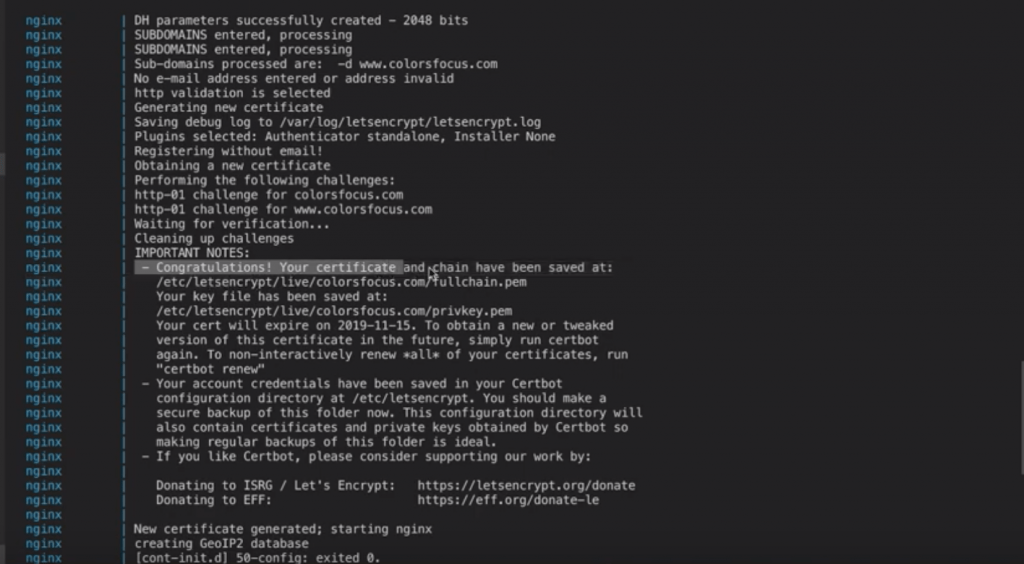
docker-compose upnow wait and watch the progress.
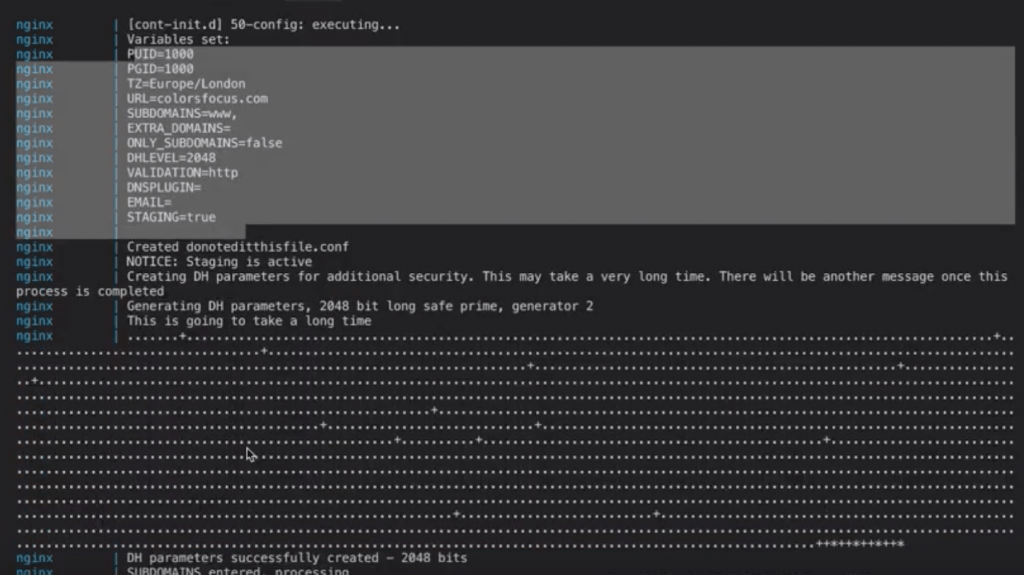
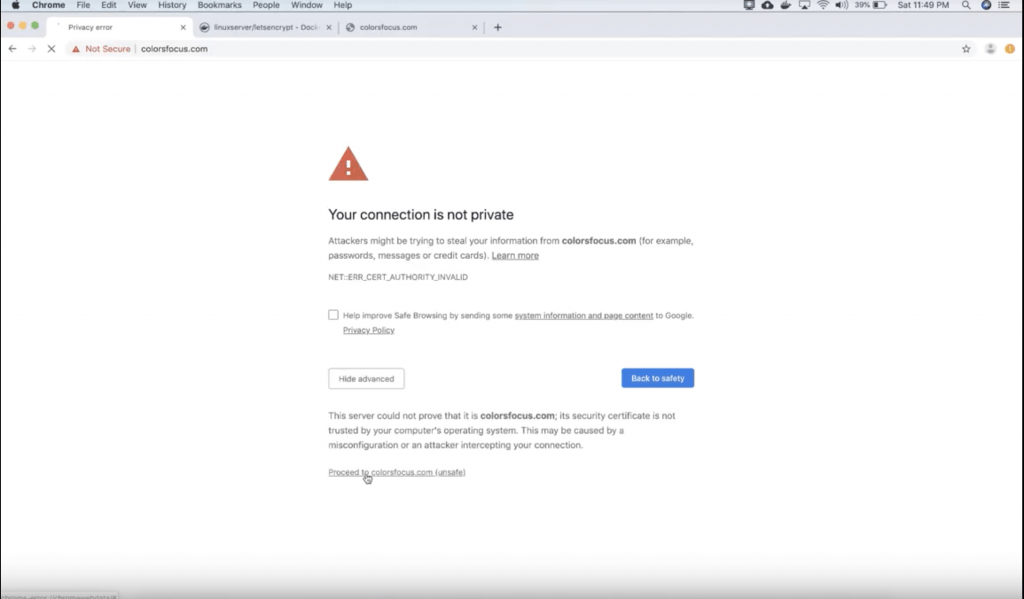
Now open your domain name in the browser and you would see a warning message saying your connection is not private. This means that your fake certificate is installed.
As now your configurations worked fine so now you are ready to install production real ssl certificate. Before this you need to remove all existing certificate configurations from the docker/nginx/configs folder.
So run this command:
rm -r /root/project/docker/nginx/configs/*run this command to shutdown all services:
docker-compose downIn docker-compose.yaml file change the value from STAGING=true to false
and then run again
docker-compose upNow watch the progress and if you see congratulations message like before then you can refresh your page to see if ssl certificate is installed. It should show lock icon with green message: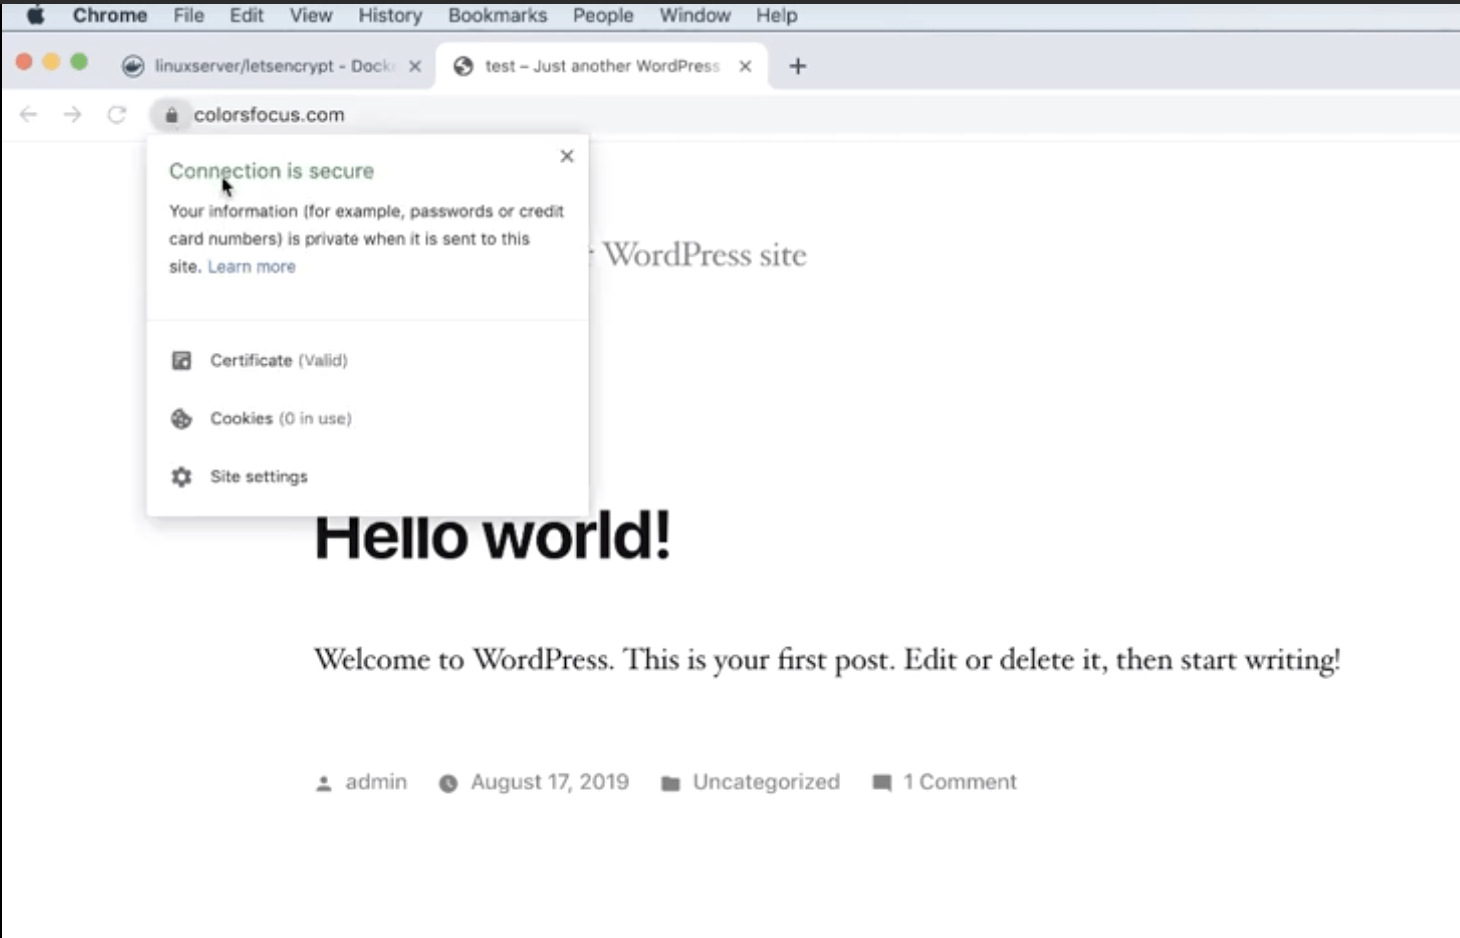
As now everything working perfectly so now stop server by pressing command + c keys on your keyboard in terminal.
And then run services in detached mode by passing -d flag so that i can keep running forever in the background without any need to keep terminal open. you can then close terminal after running this command:
docker-compose up -dGithub source code: https://bit.ly/2MoaBWf
Youtube Video Link: https://www.youtube.com/watch?v=lbXc6mKh7U0&t=587s